Best Defensive Structures Placement in Clash of Clans
11 min read Unlock the secrets of elite base defense with expert tips on defensive structure placement for Clan Wars.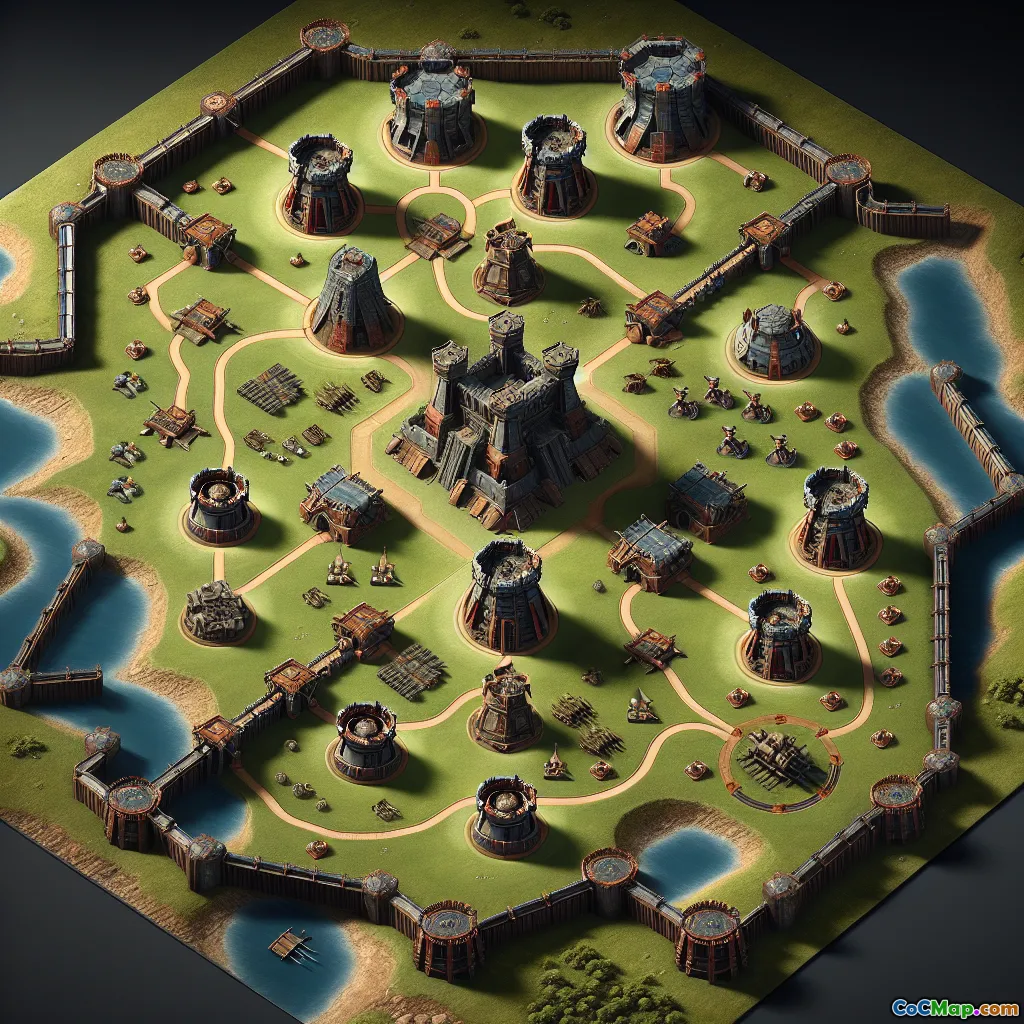
Best Defensive Structures Placement in Clash of Clans
Introduction
What separates a war base that crumbles in seconds from one that leaves attackers frustrated and defeated? The answer rarely lies in raw defensive firepower alone—it’s about how and where you place your defensive structures. In Clan Wars, where every star counts and your base is attacked by some of the most skilled opponents, strategic placement can be the difference between victory and defeat. Whether you’re a seasoned war general or a new recruit eager to help your clan climb the ranks, understanding the art of defensive placement is a game-changer.
This article dives deep into the nuances of defensive structure placement for Clan Wars, revealing insights, examples, and actionable tips to help you build war bases that stand the test of even the most advanced attackers.
Why Defensive Structure Placement Matters in Clan Wars
In regular multiplayer battles, attackers often seek loot, sometimes sacrificing stars for resources. But in Clan Wars, the stakes are higher: attackers are laser-focused on maximizing stars, using custom-tailored armies and attack plans. Here, base design and defensive placement are your first—and often only—line of defense.
A well-placed defense can:
- Force attackers into inefficient attack paths
- Neutralize popular strategies (e.g., Queen Charge, LavaLoon, Electro Dragon spam)
- Protect key structures (Town Hall, Clan Castle, Eagle Artillery)
- Maximize trap effectiveness
Let’s break down the best practices for placing each major defensive structure, supported by in-game examples and strategic reasoning.
Core Defensive Structures: Placement Principles
1. Town Hall: The Heart of Your Defense
Why Placement Matters:
- In Clan Wars and CWL, attackers must secure the Town Hall for a 2-star or 3-star win.
- The Town Hall now acts as a powerful defense (from TH12 onwards), damaging and slowing enemies.
Best Practices:
- Centralize the Town Hall in anti-3 star bases; surround it with high HP buildings and splash defenses to force attackers to commit heavy resources.
- Offset slightly in anti-2 star bases to bait attackers into traps or force awkward pathing.
- Compartmentalize: Place the Town Hall behind multiple walls to delay access and maximize defensive value.
Example: A common anti-3 star design places the Town Hall in the core, surrounded by the Eagle Artillery, Clan Castle, and high-damage defenses, with multiple layers of walls and traps.
2. Eagle Artillery: The Long-Range Threat
Why Placement Matters:
- The Eagle Artillery targets high troop concentrations and is crucial for anti-3 star defense.
Best Practices:
- Deep Core Placement: Place the Eagle far from the edge to prevent early snipes.
- Surround with Storages: Use high HP buildings to delay access.
- Avoid clustering with Town Hall: Prevent massive value from spells like Freeze or Lightning.
Player Insight: Top CWL bases often keep the Eagle and Town Hall separated to force attackers to choose which objective to prioritize.
3. Inferno Towers: Versatility and Intimidation
Why Placement Matters:
- Inferno Towers can melt heroes, tanks, or hordes—depending on their mode (single or multi).
Best Practices:
- Stagger Placement: Avoid lining up Infernos to prevent attackers from freezing both at once.
- Central but Not Adjacent: Place them towards the core, but not too close together or to the Town Hall.
- Cover Key Paths: Use Infernos to defend against Queen Charges or funneling troops.
- Mode Selection: Single for anti-hero/anti-Golem; multi for anti-swarm (e.g., bats, miners).
Example: In anti-Queen Charge bases, an Inferno is often placed to cover the Queen’s likely entry path, supported by Tesla Farms and X-Bows.
4. Clan Castle: The Trap Within
Why Placement Matters:
- Defending Clan Castle troops can disrupt attacks, especially if hard to lure.
Best Practices:
- Centralize: Place the Clan Castle so attackers must penetrate deep to trigger its troops.
- Overlap with Key Defenses: Position within range of high-value targets (e.g., Town Hall, Eagle) to protect both.
- Avoid Edge Placement: Prevent easy lures with a single Hog or Balloon.
Data Point: War bases with central Clan Castles have a significantly lower 3-star rate, especially against air attacks.
5. X-Bows: Consistent Damage Dealers
Why Placement Matters:
- X-Bows provide sustained DPS and can be set to ground, air, or both.
Best Practices:
- Triangle Formation: Space X-Bows to cover the entire base, often in a triangle or diamond pattern.
- Ground/Air Mode: Set at least one to air to counter air raids; adjust based on scouting data.
- Protect with Walls: Avoid placing all X-Bows in the open or near the edge.
Example: In anti-LavaLoon bases, at least two X-Bows are set to air and placed near core defenses.
6. Air Defenses: Anti-Air Backbone
Why Placement Matters:
- Air Defenses (ADs) are the primary counter to air-based strategies.
Best Practices:
- Spread Out: Avoid clustering to prevent attackers from taking out multiple ADs with a single spell.
- Offset from Edges: Place at least 3-4 tiles in from the edge to avoid early snipes.
- Cover Key Defenses: Position to protect the Town Hall, Eagle, and Infernos.
Comparison: Bases with well-spaced ADs see fewer successful LavaLoon or Electro Dragon attacks.
7. Wizard Towers & Bomb Towers: Splash Damage Specialists
Why Placement Matters:
- Splash damage counters swarms—critical vs. Miners, Bats, and Balloons.
Best Practices:
- Protect Storages and Core: Place near storages or core to defend against mass troops.
- Avoid Clustering: Spread out to avoid being neutralized by a single spell.
- Guard Traps: Place near Giant Bombs for anti-Hog/Miner synergy.
Player Insight: Top war bases often use Wizard Towers to cover both Air Defenses and major trap zones.
8. Archer Towers, Cannons, and Teslas: The Outer Ring
Why Placement Matters:
- These defenses shape attack paths and deter funneling.
Best Practices:
- Staggered Perimeter: Place around the outer ring to force attackers to deploy wide.
- Hidden Teslas: Use Tesla Farms (grouped Teslas) to surprise and eliminate heroes or key troops.
- Mix Heights: Alternate Archer Towers (air/ground) and Cannons (ground) to balance threats.
Example: A Tesla Farm near the Town Hall can catch attackers off guard, especially when combined with Giant Bombs.
9. Traps: The Invisible Guardians
Why Placement Matters:
- Traps can swing a battle, but only if placed where attackers don’t expect them.
Best Practices:
- Predict Pathing: Place Spring Traps and Giant Bombs where Hog Riders or Miners are likely to path.
- Air Traps: Place Seeking Air Mines near high-value targets or expected Queen Charge routes.
- Troll Traps: Use corner traps to catch cleanup troops or time-fail attackers.
Pro Tip: Review war replays to adjust trap placements based on common attack strategies faced by your clan.
Advanced Placement Strategies for Clan Wars
A. Anti-3 Star vs. Anti-2 Star Bases
- Anti-3 Star: Centralized Town Hall, spread defenses, unpredictable trap placement. Forces attackers to split their army.
- Anti-2 Star: Offset Town Hall, layered compartments, heavy protection on one side. Baits attackers into high-risk paths.
B. Compartmentalization and Pathing
- Use walls to create compartments that slow down troops and force spell usage.
- Funnel attackers into kill zones covered by splash and high DPS defenses.
C. Adaptive Placement Based on Scouting
- Adjust base layouts between wars based on enemy attack trends.
- Swap defense positions to counter popular meta attacks (e.g., move Air Sweepers to disrupt Queen Walks).
D. Community Wisdom: Learning from the Best
- Study top war clans and analyze their base replays.
- Share base designs within your clan and seek feedback after every war.
Conclusion
Mastering defensive structure placement is more than just following templates—it’s about understanding attack strategies, predicting enemy moves, and evolving your base design with every war. By applying the principles above, you’ll transform your war base from a soft target into a fortress that earns your clan the edge in every battle.
Ready to take your defense to the next level? Start by reviewing your current base, experiment with new placements, and always learn from both victories and defeats. Every adjustment brings you—and your clan—one step closer to war glory.


