Super Wizard Tower - Building Units in Clash of Clans
"Super Wizards' electrickery is shockingly powerful against swarms of attackers, as it bounces to everyone too close to the initial target."
| Level | Damage per second | Damage per hit primary | Damage per hit secondary | Hitpoints | Build cost | Capital hall level required | District hall level required |
|---|---|---|---|---|---|---|---|
| 1 | 60 | 120 | 48 | 1,800 | 6,500 | 3 | 1 |
| 2 | 70 | 140 | 56 | 2,100 | 13,000 | 4 | 2 |
| 3 | 80 | 160 | 64 | 2,400 | 26,000 | 6 | 3 |
| 4 | 90 | 180 | 72 | 2,700 | 42,000 | 8 | 4 |
| 5 | 100 | 200 | 80 | 3,000 | 70,000 | 10 | 5 |
Tapping this icon displays information about the Super Wizard Tower/Clan Capital, such as Level, Damage Per Second, Hitpoints, Range, Damage Type and Targets.
Tapping this icon contributes the Capital Gold you have into upgrading the Super Wizard Tower/Clan Capital to the next level. When the Super Wizard Tower/Clan Capital is at maximum level, this icon is not shown.
Tapping this icon marks the building's upgrade to the next level as a priority for the Clan, pinning it as a recommended upgrade for Clan members. This icon is only shown if the upgrade is possible, is not already prioritized and if the player is Leader or a Co-leader of their Clan.
Tapping this icon stops marking the building's upgrade to the next level as a priority for the Clan. This icon is only shown if the upgrade is possible, is being prioritized and if the player is Leader or a Co-leader of their Clan.
- Super Wizard Towers are a defensive building unlocked at Capital Hall level 3.
- The Super Wizard Tower is a Wizard Tower manned by a Super Wizard , who utilizes chain lightning to damage multiple targets too close to the initial target. Just like the Super Wizard troop, this chain lightning hits up to nine other targets for 40% of the damage dealt to the initial target.
- Although the arcane electricity from the Super Wizard Tower does less damage per shot than the Multi Mortar , it makes up for this by having a much higher rate of fire. This makes the Super Wizard Tower an excellent choice for defending other structures by blasting troops that get too close.
- An excellent defensive strategy for the Super Wizard Tower is to put it near your District / Capital Hall , because of the Super Wizard Tower's splash damage. However, due to its limited range, it is sometimes more desirable to put the Super Wizard Tower near the inside of your district.
- Super Wizard Towers and Multi Mortars are quite complementary, as they can each cover the other's weaknesses. Example of a Super Wizard Tower-Multi Mortar combination: The Mortar can cover a very large range so attacking units will have reduced health by the time they come into the shorter range of the Wizard Tower, which helps finish them off. In exchange, the Super Wizard Tower defends the Multi Mortar by destroying units that cannot be attacked by the Multi Mortar (all air units and ground units inside the Mortar's minimum range).
- Example of a Super Wizard Tower-Multi Mortar combination: The Mortar can cover a very large range so attacking units will have reduced health by the time they come into the shorter range of the Wizard Tower, which helps finish them off. In exchange, the Super Wizard Tower defends the Multi Mortar by destroying units that cannot be attacked by the Multi Mortar (all air units and ground units inside the Mortar's minimum range).
- Try putting Wizard Towers near Air Defenses , along with Air Bombs to take out Rocket Balloons . However, at higher levels, this is not recommended since Super Wizard Towers will get caught on Flying Fortresses , allowing supporting Rocket Balloons to obliterate your defense. Instead, focus on separating the two for allowing them to attack what they counter. Keep the Air Bombs with the Wizard Towers, and keep the Wizard Tower away from your Air Defense.
- However, at higher levels, this is not recommended since Super Wizard Towers will get caught on Flying Fortresses , allowing supporting Rocket Balloons to obliterate your defense. Instead, focus on separating the two for allowing them to attack what they counter. Keep the Air Bombs with the Wizard Towers, and keep the Wizard Tower away from your Air Defense.
- The Super Wizard Tower is able to deal with groups of troops albeit, needing time. It is best used against Skeletons , but can be effective against Minions and Sneaky Archers , being able to kill them quite fast, without them being actively healed.
- For attacking, use some units to distract it ( Super Giant S or Super Barbarians ) and destroy it with Sneaky Archers , Minion Hordes , or another ranged troop . Melee troops like Barbarians or Giants can destroy a Wizard Tower by themselves if there are enough of them, but because these troops must attack while physically touching the Wizard Tower (and are therefore grouped up), the Wizard Tower can usually destroy the entire group fairly quickly.
- When deploying units, be careful to ensure that they will not get into a clump as they come into range of the Super Wizard Tower as it can possibly destroy the group very quickly, especcially if traps and/or splash-damaging defenses are involved.
- Taking out Super Wizard Towers can be tricky despite their relatively short range. It is often a better tactic to avoid them entirely by attacking a part of the district that is not covered by them. To quickly destroy a Super Wizard Tower, deploy a few Super Giants as a distraction while Sneaky Archers, Super Wizards or Minion Hordes take out the Super Wizard Tower. Deploy troops in a circle around it since this will limit its ability to take out multiple troops with splash damage. Dropping a Super Giant and surrounding the Wizard Tower with about 20 housing space of troops will generally be sufficient to destroy it.
- Super Wizard Towers that are on the outside of a base can be easily taken out with multiple small troops. At higher Capital Hall levels, a single pair of Rocket Balloons can be quite effective provided that no Traps or Hidden Mega Teslas emerge.
- Troops with a decent amount of hitpoints can easily engage a Super Wizard Tower, as its damage per second is rather low. Even swarms of anything other than Skeletons can work well as long as a Healing Spell is being used. However, wasting a heal spell on a single Super Wizard Tower is not recommended, unless the spell also covers areas from where your troops can attack other defenses.
- Unlike Wizard Towers and other splash defenses in the Home Village and Builder Base, the Super Wizard Tower is capable of damaging both ground and air troops in the same attack. So, strategies such as protecting a Minion Horde with a Super Giant will fail without other support.
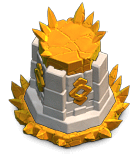
- Super Wizard Towers undergo significant visual changes at level 2, 4, and 5. When initially rebuilt, it is a cone-shaped tower with a flat surface at the the top. Its base is composed of gray stone, a white body and foundation, and a gray core. The tower itself is entirely made of stone. At level 2, the core made of gray stone receives a restored and improved white finish. At level 3, the tower receives a gold symbol on all its 4 sides. At level 4, the surface of the peak of the tower receives an elevated gold-painted stone platform. At level 5, the base of the tower gets a more aesthetically-looking gold layer, with thick spikes protruding from all around it. The stone platform of the tower's peak also receives golden spikes that are prominent at the rear view.
- When initially rebuilt, it is a cone-shaped tower with a flat surface at the the top. Its base is composed of gray stone, a white body and foundation, and a gray core. The tower itself is entirely made of stone.
- At level 2, the core made of gray stone receives a restored and improved white finish.
- At level 3, the tower receives a gold symbol on all its 4 sides.
- At level 4, the surface of the peak of the tower receives an elevated gold-painted stone platform.
- At level 5, the base of the tower gets a more aesthetically-looking gold layer, with thick spikes protruding from all around it. The stone platform of the tower's peak also receives golden spikes that are prominent at the rear view.
- The level 5 Inferno Artillery is similar to that of the level 5 Super Wizard Tower at the top, except it has barrel bores at the center and has Eagle heads on each corner, and its ring is shaped like a reticle.
- The level 5 Inferno Artillery is similar to that of the level 5 Super Wizard Tower at the top, except it has barrel bores at the center and has Eagle heads on each corner, and its ring is shaped like a reticle.
- The level 5 Inferno Artillery is similar to that of the level 5 Super Wizard Tower at the top, except it has barrel bores at the center and has Eagle heads on each corner, and its ring is shaped like a reticle.
- The level 5 Inferno Artillery is similar to that of the level 5 Super Wizard Tower at the top, except it has barrel bores at the center and has Eagle heads on each corner, and its ring is shaped like a reticle.


