Mega Mine - Clash of Clans中的建筑单位
"A hidden dose of heavy destruction. Choose air or ground!"
| Level | Damage | Cost | Build time | Experience gained | Builder hall level required |
|---|---|---|---|---|---|
| 1 | 250 | 30,000 | N/A | N/A | 4 |
| 2 | 275 | 40,000 | 1h | 60 | 4 |
| 3 | 300 | 50,000 | 3h | 103 | 4 |
| 4 | 330 | 80,000 | 6h | 146 | 4 |
| 5 | 360 | 120,000 | 12h | 169 | 5 |
| 6 | 395 | 300,000 | 1d | 293 | 6 |
| 7 | 430 | 600,000 | 1d 12h | 360 | 7 |
| 8 | 470 | 1,000,000 | 2d | 415 | 8 |
| 9 | 510 | 1,400,000 | 3d | 509 | 9 |
| 10 | 550 | 2,500,000 | 4d | 587 | 10 |
Tapping this icon displays information about the Mega Mine, such as Level, Damage Type and Targets.
Tapping this icon begins upgrading the Mega Mine to the next level, if you have enough resources and a freeMaster BuilderorO.T.T.O. When the Mega Mine is at maximum level, this icon is not shown.
Tapping this icon instantly upgrades the Mega Mine to the next level, at the cost of oneHammer of Buildingif you have one. When the Mega Mine is at maximum level, or theBuilder Hallrequirements for the next level are not met, this icon is not shown.
Tapping this icon, which is displayed only while an upgrade is in progress, instantly finishes that upgrade at the cost of the displayed number ofGems.
Tapping this icon, which is displayed only while an upgrade is in progress, instantly finishes that upgrade at the cost of oneBook of Building. This icon is only shown if you have at least one Book of Building.
Tapping this icon, which is displayed only while an upgrade is in progress, instantly finishes that upgrade at the cost of oneBook of Everything. This icon is only shown if you have at least one Book of Everything but do not have a Book of Building.
Tapping this icon, which is displayed only while an upgrade is in progress, cancels the current upgrade and refunds half of the upgrade cost.
This icon indicates that the Mega Mine is currently set to Ground mode, to attackground units. Tapping this icon switches the Mega Mine attack mode to attackair units. This icon is only displayed while the Mega Mine is in Ground mode.
This icon indicates that the Mega Mine is currently set to Air mode, to attack air units. Tapping this icon switches the Mega Mine attack mode to attack ground units. This icon is only displayed while the Mega Mine is in Air mode.
- The Mega Mine is a trap in Builder Base, unlocked at Builder Hall level 4. The Mega Mine functions similarly to the Giant Bomb in the Home Village, however, it can be set to target either ground or air and has a larger explosion radius.
- The Mega Mine resembles a regular Mine of equal level but is much larger and has two chains holding it to the ground instead of one, when set to air mode.
- It deals a lot of damage blowing up and can kill smaller troops like Raged Barbarians while set to ground mode, or Beta Minions if it is set to air. Larger troops like Boxer Giants , Hog Gliders or Baby Dragons can also be crippled by it.
- Because of its high damage, it is recommended to place it inside the base to deal heavy damage to tanks as it can be triggered by a small unit when outside.
- Setting it to air allows it to deal heavy damage to Baby Dragon or hordes of Beta Minions and is best used to protect a Firecrackers and Air Bombs from them.
- Mega Mines will do huge damage to Night Witches , if not instantly killing them (the latter is true if the Mega Mine is at least half the level of the Witches, except if the Witches are level 18), a simple but risky strategy to defend against Night Witches involves placing a Mega Mine in a corner of the map where attackers are likely to place Night Witches to stack up Bats . If the attacker fails to check for Traps , the Mega Mine will destroy most if not all of the attacker's Night Witches which will undoubtedly ruin their attack. However, most Night Witch users usually put the Battle Machine first to check for it. For maximum efficiency, place air-set Mines to destroy the summoned Bats, usually on the outside of the base after the Night Witches have been blown up.
- For maximum efficiency, place air-set Mines to destroy the summoned Bats, usually on the outside of the base after the Night Witches have been blown up.
- It may be beneficial to set the Mega Mine to ground in Night Witch-dominant trophy ranges, and set normal Mines to air instead.
- Make sure to check for traps when going against the Mega Mine. Use an expendable troop or a high-hitpoint troop to activate it first. The Battle Machine can do this job as well; its ability (if unlocked) can regenerate the health it loses from the trap. You can activate a Mega Mine over Walls by placing a troop in its trigger radius. This can be very effective if your opponent has a Mega Mine inside their base.
- You can activate a Mega Mine over Walls by placing a troop in its trigger radius. This can be very effective if your opponent has a Mega Mine inside their base.
- Keep in mind that the Mega Mine has a bigger damage radius than trigger radius, allowing it to damage units farther away from the unit that triggered it.
- See if your opponent has any empty 2x2 space in their base, as it can potentially be a Mega Mine or a Hidden Tesla .
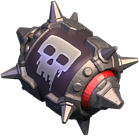
- The Mega Mine undergoes significant visual changes at level 3, 4, 7, and 9. When initially built, the Mega Mine is a large wooden barrel with ropes strapped around it to hold it together. A red fuse connects a yellow square timer located on the side of the barrel to the head. Periodically, the timer rotates 90° clockwise. If the Mega Mine is set to air, chains can be seen suspending the barrel in midair. At level 2, the ropes are replaced by steel bands that are fixed to the barrel with rivets. At level 3, the barrel is painted cardinal red. At level 4, the wooden barrel is replaced by a red metallic sphere with various steel parts, including a band of steel around its equator, reinforcements supporting the band, as well as a gray metallic pressure plate on the poles and nails around it. At level 5, the square timer disappears, and more metal pressure plates are added above and below the equator of the sphere. At level 6, large metal spikes are added to the smaller pressure plates. At level 7, the spikes are removed, and the mine gains a sepia black paint job with a white painted skull, and a reinforcement is removed to reserve space for the skull painting. The pressure plates disappear, and the mine is slightly rotated clockwise. At level 8, the spikes are added again to the main body. At level 9, the Mega Mine reverted to cylindrical shape as the sides of the cylinder are reinforced with thick metal rings supported by nails. The area surrounding the large pressure plates open up, revealing a glowing, yellow interior. The skull painting is angled much higher than previously. At level 10, the glowing interior is covered up with a thin red frame, and the wooden support beams are removed. Several spikes are added on the circular rims. When set to air mode, the Mega Mine will appear to float, supported by two metal chains.
- When initially built, the Mega Mine is a large wooden barrel with ropes strapped around it to hold it together. A red fuse connects a yellow square timer located on the side of the barrel to the head. Periodically, the timer rotates 90° clockwise. If the Mega Mine is set to air, chains can be seen suspending the barrel in midair.
- At level 2, the ropes are replaced by steel bands that are fixed to the barrel with rivets.
- At level 3, the barrel is painted cardinal red.
- At level 4, the wooden barrel is replaced by a red metallic sphere with various steel parts, including a band of steel around its equator, reinforcements supporting the band, as well as a gray metallic pressure plate on the poles and nails around it.
- At level 5, the square timer disappears, and more metal pressure plates are added above and below the equator of the sphere.
- At level 6, large metal spikes are added to the smaller pressure plates.
- At level 7, the spikes are removed, and the mine gains a sepia black paint job with a white painted skull, and a reinforcement is removed to reserve space for the skull painting. The pressure plates disappear, and the mine is slightly rotated clockwise.
- At level 8, the spikes are added again to the main body.
- At level 9, the Mega Mine reverted to cylindrical shape as the sides of the cylinder are reinforced with thick metal rings supported by nails. The area surrounding the large pressure plates open up, revealing a glowing, yellow interior. The skull painting is angled much higher than previously.
- At level 10, the glowing interior is covered up with a thin red frame, and the wooden support beams are removed. Several spikes are added on the circular rims.
- When set to air mode, the Mega Mine will appear to float, supported by two metal chains.
- The Mega Mine does the most damage out of all damaging Builder Base traps and defensive buildings in Builder Base.
- One Mega Mine and a cluster of four Mines take up the same space and do equal damage at equal levels (up to level 8). However, the Mines have a bigger damage radius altogether.
- For levels 1-4, the dial timer on the Mega Mine is square in contrast of the regular Mine which has circular dials for the same levels.
- Its explosion animation uses the Giant Bomb and the Air Bomb 's explosion at the same time.


