Royal Gem - Clash of Clans中的军队单位
Royal Gem
hero-equipment-home-village
"Heals the Royal Champion by an extra large amount"
User
Royal Champion
Ability Type
Active
Rarity
Common
Unlock Requirement
Available by default
| Level | Health recovery | Hero boosts damage per second increase | Hero boosts hitpoint increase | Upgrade cost damage per second increase | Upgrade cost hitpoint increase | Blacksmith level required |
|---|---|---|---|---|---|---|
| 1 | 1,200 | 35 | 60 | N/A | N/A | N/A |
| 2 | 1,200 | 40 | 90 | 120 | - | 1 |
| 3 | 1,450 | 45 | 120 | 240 | 20 | 1 |
| 4 | 1,450 | 50 | 150 | 400 | - | 1 |
| 5 | 1,450 | 55 | 180 | 600 | - | 1 |
| 6 | 1,600 | 60 | 210 | 840 | 100 | 1 |
| 7 | 1,600 | 65 | 240 | 1,120 | - | 1 |
| 8 | 1,600 | 70 | 270 | 1,440 | - | 1 |
| 9 | 1,800 | 75 | 300 | 1,800 | 200 | 1 |
| 10 | 1,800 | 80 | 330 | 1,900 | - | 3 |
| 11 | 1,800 | 85 | 360 | 2,000 | - | 3 |
| 12 | 2,000 | 90 | 390 | 2,100 | 400 | 3 |
| 13 | 2,000 | 95 | 420 | 2,200 | - | 5 |
| 14 | 2,000 | 100 | 450 | 2,300 | - | 5 |
| 15 | 2,200 | 105 | 480 | 2,400 | 600 | 5 |
| 16 | 2,200 | 110 | 510 | 2,500 | - | 7 |
| 17 | 2,200 | 115 | 540 | 2,600 | - | 7 |
| 18 | 2,400 | 120 | 570 | 2,700 | 600 | 7 |
- The Royal Gem is a piece of Common Hero Equipment for the Royal Champion . It is one of two pieces of Hero Equipment that the Royal Champion starts with, the other being the Seeking Shield .
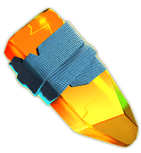
- The Royal Gem appears as an orange gem which grows yellow to the bottom, wrapped by a blue cloth around the top. When equipped, it grants a large amount of health recovery to the Royal Champion when she uses the ability. This compounds additively with the health recovery stat that she has innately.
- In addition, the Royal Gem increases the Royal Champion's damage per second and hit points when equipped.
- The Royal Gem is best activated in the middle of the base where the hero has low health to guarantee the maximum health recovery from this ability.
- It can be paired with the Hog Rider Puppet when you are going up against a single Inferno Tower or a Monolith . The Royal Champion will gain almost all of her health back, also turning invisible, causing defenses to target the Hog Riders, and they will then subsequently destroy said defense.
- When paired alongside the Haste Vial, this allows for Royal Charges to be possible with the help of Invisibility Spells to keep her invisible, ensuring her survivability. This can be further improved if the Spirit Fox is paired with the Royal Champion.
- This can be further improved if the Spirit Fox is paired with the Royal Champion.
- The Royal Gem can also be paired with the Seeking Shield , as it helps the Champion gain health while destroying or dealing significant damage to four defenses, which can be very helpful for your main army to take down later.
- It can fit into many attacks involving the Royal Champion, but if you are using the Royal Champion for a suicide operation, then things such as the Seeking Shield and the Hog Rider Puppet might be a better choice, since they can deal great damage to the base, and you do not have to use a hero equipment slot to make sure that the Royal Champion stays alive.
- While this looks like a generic ability, the health recovery can be massive and can help the champion stay alive longer and make the attack more effective.
- Increased passive damage increase at all levels by 15: Level 1: 20 -> 35 Level 2: 25 -> 40 Level 3: 30 -> 45 Level 4: 35 -> 50 Level 5: 40 -> 55 Level 6: 45 -> 60 Level 7: 50 -> 65 Level 8: 55 -> 70 Level 9: 60 -> 75 Level 10: 65 -> 80 Level 11: 70 -> 85 Level 12: 75 -> 90 Level 13: 80 -> 95 Level 14: 85 -> 100 Level 15: 90 -> 105 Level 16: 95 -> 110 Level 17: 100 -> 115 Level 18: 105 -> 120
- Level 1: 20 -> 35
- Level 2: 25 -> 40
- Level 3: 30 -> 45
- Level 4: 35 -> 50
- Level 5: 40 -> 55
- Level 6: 45 -> 60
- Level 7: 50 -> 65
- Level 8: 55 -> 70
- Level 9: 60 -> 75
- Level 10: 65 -> 80
- Level 11: 70 -> 85
- Level 12: 75 -> 90
- Level 13: 80 -> 95
- Level 14: 85 -> 100
- Level 15: 90 -> 105
- Level 16: 95 -> 110
- Level 17: 100 -> 115
- Level 18: 105 -> 120
- Increased passive hitpoint increase at all levels by 50%: Level 1: 40 -> 60 Level 2: 60 -> 90 Level 3: 80 -> 120 Level 4: 100 -> 150 Level 5: 120 -> 180 Level 6: 140 -> 210 Level 7: 160 -> 240 Level 8: 180 -> 270 Level 9: 200 -> 300 Level 10: 220 -> 330 Level 11: 240 -> 360 Level 12: 260 -> 390 Level 13: 280 -> 420 Level 14: 300 -> 450 Level 15: 320 -> 480 Level 16: 340 -> 510 Level 17: 360 -> 540 Level 18: 380 -> 570
- Level 1: 40 -> 60
- Level 2: 60 -> 90
- Level 3: 80 -> 120
- Level 4: 100 -> 150
- Level 5: 120 -> 180
- Level 6: 140 -> 210
- Level 7: 160 -> 240
- Level 8: 180 -> 270
- Level 9: 200 -> 300
- Level 10: 220 -> 330
- Level 11: 240 -> 360
- Level 12: 260 -> 390
- Level 13: 280 -> 420
- Level 14: 300 -> 450
- Level 15: 320 -> 480
- Level 16: 340 -> 510
- Level 17: 360 -> 540
- Level 18: 380 -> 570
- The Royal Gem is the only Hero Equipment that could be perceived to not provide an actual Hero ability, as its health regeneration could in theory be categorized as a passive Hero boost.


